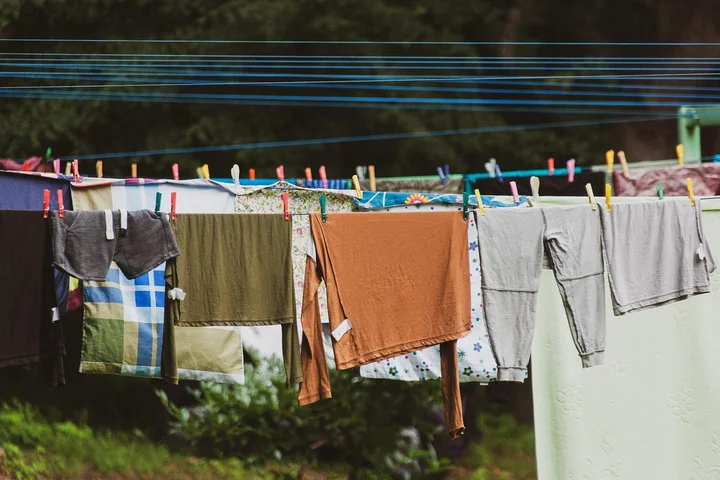
How to Remove Toothpaste Stains from Clothes, Fabric, and Dentures
Finding a blob of toothpaste on your shirt or a film on your dentures is a common hassle. For most fresh stains, a immediate rinse with cool water and a gentle rub with liquid dish soap will lift it right out.
This article gives you my tested, step-by-step methods for every situation:
- The fastest way to stop a new toothpaste stain on clothing from setting.
- How to tackle stubborn, dried-on stains from different fabrics.
- Safe cleaning steps for dentures that won’t scratch or damage them.
- Simple habits to prevent these messy stains in the first place.
I’ve handled countless toothpaste spills from my son Jason’s school uniforms to my aunt Jessica’s delicate table linens, so you’re getting real-world advice.
What Is a Toothpaste Stain, Really?
You know that look. It starts as a goopy blob of white or blue gel on your shirt. By the time you find it, it’s dried into a crusty, stiff patch.
The stain leaves behind a dull, filmy residue that just won’t brush off.
Toothpaste isn’t just one thing. It’s a team of ingredients working together, which is what makes the stain so stubborn. This is why many stain-removal hacks compare toothpaste to hairspray to see which method works best.
- Abrasives: These are the gritty solids, like silica or calcium carbonate. They scrub your teeth clean but act like tiny pieces of sand on fabric.
- Surfactants: These create the soapy suds. They help the paste spread and foam, but they can leave an oily film behind.
- Dyes & Whiteners: Many toothpastes have blue or green coloring for visual appeal, and whitening agents like peroxide.
Chemistry Corner
Think of a toothpaste stain as a triple threat. It’s not simple.
It’s a ‘combo stain’ made of oily surfactant residue, particulate grit, and sometimes a dye. You can’t treat it like just a food spill or just a grease spot.
The paste dries fast. This quickly bonds the gritty abrasives and any dyes directly to the fibers of your shirt or bathroom rug.
That’s why rubbing it is the worst thing you can do. You’re literally sanding the color into the material.
Your First 60 Seconds: Critical Stain First-Aid
This happens most mornings in my house. Someone (usually Jason or Jessica) is rushing, leans over the sink, and bloop-there’s a stripe of minty gel on their tee.
In that moment, panic sets in. Your instinct is to wipe it. Fight that urge!
Do not rub the stain. Rubbing grinds those abrasive particles deep into the fabric, making the stain permanent and even more difficult to remove from delicate fabrics.
Here is your universal first-aid plan. It works on clothes, upholstery, and even the countertop.
- Scrape Off the Excess. Use the blunt edge of a butter knife, a spoon, or even an old gift card. Gently lift the bulk of the paste off the surface. I keep a dedicated plastic spoon in my laundry room for jobs like this.
- Rinse from the Backside. Turn the fabric inside out. Hold the stained area under a gentle, cold stream of water, aiming at the back of the stain. This pushes the paste residue out the way it came in, instead of driving it deeper through the fabric.
For a countertop or hard surface, step two is just a quick wipe with a cold, wet cloth.
This quick action removes most of the problem before it sets. It won’t fix every stain, but it gives any follow-up treatment a real fighting chance. For best results, avoid common stain-removal mistakes.
How to Get Toothpaste Out of Clothes (The Full Process)
Toothpaste on clothing is a common, fixable mess. The answer to “how to remove toothpaste stains from clothing” is all about timing and technique. Act fast, and you can often rinse it right out.
I treat toothpaste as a combination stain. It has water, surfactants (soap), abrasives, and sometimes dyes or oils. Your goal is to dissolve and flush it away before it dries into the fabric.
For Most Washable Shirts, Pajamas, and Towels
Cotton, polyester, and blends are forgiving. Here is my go-to method.
- Scrape off any globs with a dull knife or spoon.
- Turn the fabric inside out and hold the stained area under a strong stream of cold water. Push the stain out from the back.
- Rub the fabric gently against itself under the water. This friction helps loosen the paste from the fibers.
- If a greasy or colored residue remains, apply one drop of clear dish soap (I use Dawn Platinum) directly to the spot. Work it in with your fingers.
- Rinse thoroughly under cold water again until the water runs clear and the soap is gone.
Always check that the stain is completely gone before you even think about using a dryer. Heat is your enemy here, as it can bake in any leftover residue.
What Helped Me (A Pro-Tip from My Laundry Room)
When Jason gets ready for school, his white soccer jersey is a target. I keep a cheap, soft-bristled toothbrush by the sink just for stains.
For a dried-on spot, I dampen it, add a tiny bit of dish soap, and use the brush to gently *lift* the paste from the cotton weave. The bristles get into the threads without damaging them. It works better than frantic scrubbing with a cloth.
For Delicate or “Dry Clean Only” Fabrics
This is where you slow way down. Your first and best tool is patience.
Start by dabbing the stain with a cloth dipped in cold water. Never rub. Just blot to lift moisture and dissolve the paste. Be careful when cleaning delicate materials like suede.
Material Red Flags: Treat silk, wool, velvet, and acetate with extreme caution. Their fibers are delicate and can be damaged by scrubbing or even some soaps.
If cold water dabbing isn’t enough, test any cleaning solution on a hidden seam. Let it dry completely to check for color loss or texture change.
Post-Treatment Recovery: The All-Important Dry
Lay the item flat on a clean towel to air dry, away from direct sunlight. This gives you a final look.
If you see a faint shadow after it dries, the stain isn’t gone. Simply repeat the treatment. The heat from a dryer can set any remaining dye or oil, making it permanent.
Give yourself permission to treat it twice. It’s better than baking the mistake in for good.
Toothpaste on Carpets, Upholstery, and Car Interiors
The question “how to remove toothpaste stains from fabric?” applies to more than just clothes. The principles are similar, but your technique changes with the surface. That includes braces stains on clothing fabric, which follow the same basic principles. But these require tweaks for fabric type.
The Surface Compatibility Chart
| Surface | Core Action | Key Tool |
|---|---|---|
| Carpet & Area Rugs | Blot, never rub | White cloth, cold water |
| Upholstery (Fabric Sofa) | Dab gently | Soft sponge, mild soap |
| Car Cloth Seats | Blot, mild soap | Microfiber cloth |
| Hard Plastic / Vinyl (Car Dash) | Wipe clean | Damp cloth |
The Reliable Two-Step for Carpets and Rugs
This is my method for how to get a toothpaste stain out of carpet. It worked on our living room rug after a late-night, half-awake incident with my daughter Jessica.
Step 1: The Flush. Use a white cloth (so you can see the stain transferring) dampened with cold water. Blot from the edge of the stain inward. This prevents it from spreading. Keep blotting until no more paste transfers.
Step 2: The Clean. Mix a cup of cold water with one tiny drop of clear dish soap. Dampen a fresh corner of your cloth in this solution and blot the area. Then, “rinse” by blotting with a cloth dipped in plain cold water to remove any soapy residue.
Press the area with a dry towel to absorb moisture. Never soak the carpet pad. You want to blot, not pour. A wet pad can lead to mildew and odors.
How to Clean Stains from Dentures Safely

People often ask me if toothpaste ruins dentures. The first thing to know is what you’re actually cleaning.
That white mark is usually dried paste residue, not a deep dye stain like on fabric.
You should never use regular toothpaste on dentures, as its abrasives can scratch the delicate acrylic.
Scratches make future stains more likely and can harbor bacteria. I always use gentler methods.
The Right Way to Remove Paste Residue
Cleaning dentures is simple if you have the right tools. Here is my reliable process.
- Rinse the denture right away under a stream of warm water. Do not use hot water, as it can warp the shape.
- Gently scrub every surface with a soft denture brush and a denture-specific cleanser. A drop of mild dish soap works in a pinch.
Sometimes paste gets packed into the tiny grooves around teeth.
For that, I use a white vinegar soak. Mix one part vinegar with three parts warm water in a cup.
Let the denture sit in this solution for about 10 minutes to soften the hardened gunk.
Then, give it another gentle brush with your denture brush. The residue should wipe away easily.
There is one step you can never skip, no matter which cleaner you use.
You must rinse the denture thoroughly under running water before wearing it again.
Leftover cleaner or vinegar can taste terrible and irritate your mouth.
When the Stain Has Set: Fixing Old or Dried Spots
We’ve all tossed a shirt in the hamper, only to find a crusty white spot after washing. That set-in toothpaste needs a different approach.
First, scrape off any flaky material with a dull knife. Then, you need to re-wet and break down the stain.
Make a thick paste from baking soda and a little water, or apply a small blob of enzyme laundry detergent directly to the spot.
Rub it in gently with your finger. Let this pre-treatment sit on the fabric for at least 30 minutes, or even longer for tough spots.
For white cotton t-shirts or sturdy, colorfast fabrics, a soak can lift the stain further.
Fill a sink or bucket with warm water and add an oxygen-based bleach like OxiClean according to the package directions.
Let the garment soak for 3 to 6 hours before washing it normally with detergent.
My mom Martha swears by a paste of baking soda for the dried blob on my dad’s work shirt cuff. She lets it sit for an hour before washing.
She learned that in North Texas, and it works on my son Jason’s soccer jerseys too.
After washing, check the spot before you put the item in the dryer. Heat can set any remaining stain.
Remember, some very old stains may only fade to a faint shadow instead of disappearing completely.
I see this with Roger’s work clothes sometimes. We get them clean, but a slight reminder of the mess remains.
Keeping Toothpaste in the Sink: Simple Prevention
Preventing toothpaste stains is all about smart, simple habits. I don’t preach perfection. My bathroom has seen its share of minty mishaps, especially with Jessica around. Sometimes the real trick is debunking the toothpaste-stains myth that they’re unstoppable. Next, I’ll share a quick, myth-busting take on toothpaste stains and simple cleaning tricks.
A few small tweaks to your routine can save you a lot of scrubbing later.
Handle the Tube with Care
Always screw the cap on tightly. I mean really tight. A loose cap is an invitation for a gooey spill. My husband Roger learned this after his tube rolled off the counter and decorated a towel.
Squeeze from the very bottom of the tube, not the middle, to control the paste and prevent surprise globs. It makes the tube last longer, too.
Shield Your Shirt
Brushing your teeth in a work shirt? Drape a small hand towel over your chest like a bib. It sounds silly, but it works.
This is my go-to move on busy mornings, and it has saved more than one blouse from a dull white splatter. My Aunt Jessica, a fellow wine enthusiast, taught me this trick to protect her clothes from all sorts of spills.
Create Kid-Friendly Zones
For kids like Jason and Jessica, use only a pea-sized amount of toothpaste. Watch them brush. This isn’t about micromanaging. It’s about guiding the brush away from their shirt.
Put a fun, dedicated cup by the sink for them to rest their toothbrush in. It catches drips perfectly. Jason’s friend Edward loves the soccer-themed cup we use. It turns drip containment into a game.
Accidents still happen. Just last week, Peeta’s wagging tail sent a tube flying. If toothpaste does escape the sink, you already know how to tackle the stain without worry.
FAQ about Removing Toothpaste Stains
I’m at work and just got toothpaste on my shirt. What’s my fastest fix without water?
Let the paste dry completely, then gently scrape off the crusty residue with a blunt edge like a credit card. Once home, apply a drop of dish soap to the stain, let it sit for 10 minutes, then rinse from the fabric’s backside with cold water.
How do I remove a colored (blue/green) toothpaste stain that’s left a dye mark?
After scraping and rinsing, dampen the stain and rub in a small amount of white vinegar or lemon juice with your finger. Let it sit for 5-10 minutes before rinsing thoroughly, as the mild acid can help break down the dye on fabrics or surfaces.
What’s a safe alternative to dish soap for pre-treating a stain on dry-clean-only fabric?
Use a solvent-based stain remover stick or a dab of rubbing alcohol on a cotton swab. Always test it on a hidden seam first and blot gently—do not rub—to lift the oily surfactant residues from the delicate fibers.
The stain on my carpet is gone, but the spot is still wet. How do I dry it properly?
Press the area repeatedly with a thick stack of dry, white paper towels or a clean, absorbent bath towel. You can also place a heavy book on top of a dry towel over the spot for an hour to wick out moisture from the carpet pad and prevent mildew.
I used toothpaste to clean my dentures and now they’re cloudy. What did I do wrong?
The abrasives in regular toothpaste have scratched the acrylic. Stop using it immediately. To remove the cloudy film, soak them in a 50/50 solution of white vinegar and water for no more than 15 minutes, then brush gently with a soft denture brush and rinse well.
Keeping Your Fabrics and Dentures Stain-Free
Acting fast is your most powerful tool against toothpaste stains. I always tell my family to blot and rinse the spot immediately; that simple step makes everything that comes after much easier. Tile stains deserve the same careful approach. There are several types of tile stain cleaning methods that work best on different surfaces. For more trusted methods and tips, you can always find me sharing what works (and what doesn’t) right here on the blog.
Suzanne is an accomplished chemist, laundry expert and proud mom. She knows the science and chemistry of stains and has personally deal with all kinds of stains such as oil, grease, food and others. She brings her chemistry knowledge and degree expertise to explain and decode the science of stain removal, along with her decades long experience of stain removal. She has tried almost everything and is an expert on professional and DIY stain removal from clothes, fabric, carpet, leather and any other items dearest to you.