How Do You Clean Stained Pool Tiles and Coping?
Those ugly stains on your pool tiles don’t have to be a permanent eyesore. With the right approach, you can often restore them using simple ingredients like vinegar or baking soda.
Here’s exactly what we’ll cover to get your pool looking pristine again:
- First, figure out what kind of stain you’re facing-mineral, organic, or something else.
- Learn which cleaners are safe for your specific tile and coping materials.
- Follow my step-by-step cleaning process that I use on my own pool.
- Get tips on protecting delicate surfaces while you work.
- Find easy habits to prevent stains from returning next season.
I’ve tested every method here on my family’s pool, so you’re getting advice that’s been proven in a real backyard.
Panic-Level Assessment: How Urgent Is Your Pool Tile Stain?
Take a deep breath. Your pool isn’t flooding, and the structure isn’t cracking.
Most pool tile stains are a solid 3 to 6 on my personal panic scale. A 10 is a cracked foundation. A 1 is a single water spot on your car. Your splotchy tile is somewhere in the middle, more about stubborn looks than immediate danger.
The real urgency comes from the “Golden Window” for cleaning, which changes based on the stain type.
For organic gunk like algae or leaf stains, you have about a week. After that, it bonds and becomes a much tougher scrub. For hard, white mineral scale, you might have months, but letting it build up just makes the eventual job harder.
The main goal is preserving your grout and the tile surface itself. Think of it like Jason’s soccer mud on our concrete driveway. If I spray it off that day, it’s easy. If I wait all season, it bakes into a permanent, shadowy stain.
Stain Detective Work: Identifying What’s on Your Tiles and Coping
You need to know your enemy before you attack. Figuring out the stain type is your first real job.
I group them into three main families.
Organic Stains are from living (or once-living) things. Think algae, leaves, or dirt. They’re often green, black, or brown. They might feel slimy or leave a fuzzy patch. These are common in shaded areas or where debris collects.
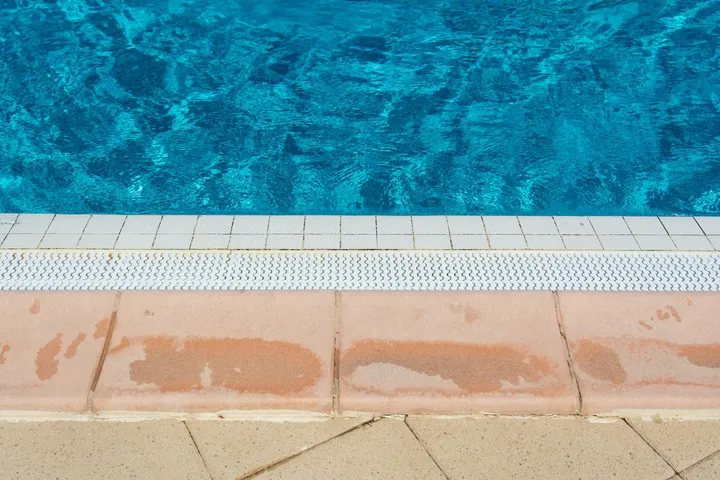
Mineral Stains are your hard water deposits. This is usually white, chalky, or crusty calcium scale. It feels rough, like sandpaper, and builds up at the waterline. It’s pure chemistry, not biology.
Metal Stains come from your water source or old pipes. Iron leaves rusty brown or reddish rings. Copper can create bluish-green splotches. They look like someone spilled iced tea or a weird soda on the tile.
Here’s a trick I learned from an old pool guy. Take a plain vitamin C tablet (ascorbic acid) and rub it directly on a reddish stain for 30 seconds. If the stain lightens noticeably, you’ve got iron. It’s a fantastic, harmless first test.
The Surface Compatibility Chart: Know Your Tile and Coping
Your cleaning method is a one-two punch: the right chemical for the stain, on the right surface. Getting this wrong can do more harm than good. Stain Removal Mistakes to Avoid
Here’s a quick guide to common poolside materials.
- Glazed Ceramic/Porcelain Tile: Your workhorse. Its glass-like surface is very resistant. It can handle mild acids (for scale) and gentle, non-scratch abrasives. This is what I have, and it’s forgiving.
- Glass Tile: Beautiful but delicate. Harsh abrasives will scratch its glossy finish instantly. Stick to non-abrasive pads and appropriate liquid cleaners only.
- Natural Stone Coping (Travertine, Marble, Limestone): The divas of pool surrounds. They are porous and often acid-sensitive. Vinegar or pool acid will etch them, leaving permanent dull spots.
- Concrete or Paver Coping: Tough and porous. Can handle more robust cleaning but may need sealing afterward. Gentle abrasives are usually okay.
The non-negotiable rule for every single material is to test your cleaner in a hidden corner first, like behind a ladder or pot. I test every single time, even with products I’ve used for years.
Material Red Flags and “Never-Use” Chemicals
This is the safety briefing. Please don’t skip it.
Some combinations of material and cleaner are a fast track to permanent damage.
Never use vinegar, muriatic acid, or other acidic cleaners on marble, travertine, limestone, or any unsealed natural stone. You will etch it. My Aunt Jessica learned this the hard way on her Arizona patio stone with a spilled wine cleaner.
Avoid harsh, gritty abrasives (like steel wool or heavy-duty Scotch-Brite pads) on soft glass tiles or high-gloss finishes. You’ll trade a stain for a swarm of fine scratches.
Finally, never, ever mix chemicals to make a “super cleaner.” Mixing chlorine bleach with an acid (like vinegar or tile cleaner) creates toxic chlorine gas. It’s incredibly dangerous. Clean with one product at a time, and always rinse thoroughly in between.
Your Safe, DIY Cleaning Toolkit: Household Items That Work
So what are the most common household items you can use to remove pool tile stains? You likely have the core ingredients in your kitchen and laundry room right now.
I always reach for these safe starters first.
- Dish Soap: The surfactants in plain dish soap are fantastic for breaking down body oils, sunscreen, and general organic grime. It’s my first line of defense for anything greasy or slick.
- Baking Soda: Mixed with a little water into a paste, it provides gentle abrasion. It’s perfect for scrubbing away mild dirt rings without scratching the tile’s glossy surface.
- White Vinegar: This is your secret weapon against those white, crusty mineral deposits. Its mild acidity dissolves calcium and lime scale beautifully.
I love the “Safe DIY Alternatives” philosophy. My aunt Jessica taught me that cream of tartar (a byproduct of winemaking) is a brilliant, mild acid for stains. Fresh lemon juice works similarly. These items are effective and non-toxic, which matters around family and pets.
The safest method to clean tiles without damaging them always starts with the gentlest option and a soft touch. You wouldn’t scrub a silk blouse with a steel brush, right? Treat your pool tiles with the same respect.
The Step-by-Step Gentle Clean for Most Stains
For general maintenance or light stains, this is my universal first pass. It works on both tiles and the pool’s coping stone.
- Mix a few squirts of dish soap into a bucket of warm water.
- Dip a soft-bristled brush or an old toothbrush into the solution. I have a dedicated “pool brush” that’s softer than the one I use on the patio.
- Gently scrub the stained area. For coping, use a “blot and lift” motion, much like you would on a fabric stain, to pull grime out of the stone’s pores.
- Rinse thoroughly. I use water from a garden hose or even a bucket of pool water to avoid sending soapy runoff directly into the pool’s main filter system.
This simple process removes about 80% of common issues. It’s what I do every other week during swim season to keep things sparkling.
Chemistry Corner: Why Your DIY Solution Works
Let’s talk about why these simple items are so effective. It’s straightforward chemistry.
Acids, like white vinegar or lemon juice, dissolve alkaline mineral scale (calcium). Think of it like dissolving sugar in your iced tea-the acidic vinegar breaks the crusty scale into particles that can rinse away.
Surfactants in dish soap work by surrounding and lifting oily, organic grime so it can be suspended in water and wiped off. Unlike emulsifiers in stain removers, dish soap surfactants are formulated specifically for kitchen use.
For green organic stains from algae or leaves, oxidation is key. Biological stains often need special treatment. A diluted bleach solution works by breaking down the color molecules. Baking soda’s mild abrasion physically scrubs away what the chemistry has loosened.
Targeted Attacks for Stubborn Organic, Mineral, and Metal Stains
When a gentle clean isn’t enough, you need to identify your enemy. Different stains require different tactics. People often ask, “How do I remove hard water or calcium scale buildup?” or “Are there specific products designed for different stain types?” The answer is yes—especially when it comes to hard water stains on bathroom surfaces.
Here are my mini-protocols for the tough guys. I recommend product categories like “citric acid-based descaler” or “chelating agent for metals” so you can find what works at your local store.
Banishing White, Crusty Calcium Scale
That ugly white line at the water level is hard water scale. To dissolve it, you need an acid.
My go-to is a 50/50 mix of white vinegar and warm water. Soak a paper towel or rag in the solution and press it directly onto the scale line on the tile. Let it sit for 15-20 minutes. The scale should soften and wipe right off with a soft brush.
Important warning: do not use vinegar on sensitive natural stone coping, like limestone or travertine, as it can etch the surface. For those, use a baking soda paste instead.
My mom Martha, who deals with brutal North Texas well water, has a great trick for thick buildup. After an acid soak, she gently nudges it off with a plastic putty knife. A metal blade can scratch your tile forever.
Eradicating Rust and Metal Stains
Rust stains from a forgotten tool or metal furniture are a reddish-brown eyesore. They require a different approach. On metal surfaces, rust removal often calls for specific cleaners and careful technique to prevent further damage. This article will cover those methods and tips.
Make a thick paste of cream of tartar and hydrogen peroxide. Smear it over the stain and let it sit for up to an hour. The chemical reaction helps lift the iron from the surface. Scrub gently and rinse. This method is especially effective for removing rust stains from fabrics.
For a small, fresh rust spot, try a pro-tip I learned from a pool maintenance friend. Crush a vitamin C tablet, mix it with water to make a paste, and apply it. The ascorbic acid is a gentle chelating agent that binds to the iron.
What to Do When a Stain Won’t Budge
What should you do if a stain does not come off with regular cleaning? First, don’t panic and don’t get aggressive. Sometimes, stubborn stains on delicate fabrics or outerwear require special care.
It’s time to step up to a cleaner formulated specifically for pool tiles. These are designed to be effective yet safe for the pool environment when used correctly. Always follow the product’s label instructions to the letter, especially regarding dwell time and rinsing.
Sometimes, a stain is too deep. Organic matter can etch into porous stone coping, or metals can actually stain below the surface. If multiple targeted treatments show no improvement, you might be dealing with permanent damage.
My advice is to know when to stop. You can cause more harm by over-scrubbing with harsh chemicals. Reassess. Sometimes, a professional assessment or a simple sealant for the coping stone is the smarter, long-term solution.
Pressure Washing, Draining, and the Big Tools
You might look at those stains and think a pressure washer is the perfect tool. I get it. My husband, Roger, thinks his pressure washer is the solution to every outdoor mess. But for pool tile, you have to be very careful, especially when trying to remove iron stains from tile and grout.
So, can pressure washing damage pool tiles? Absolutely. High-pressure water can blast the grout right out from between your tiles. Once that grout is compromised, water gets behind the tiles and you’re looking at a much bigger, more expensive repair than a simple stain.
I strongly advise against using a high-pressure setting on most pool tiles and coping materials. The risk of damage is just too high.
A much safer alternative is a standard garden hose with a “turbo” or “jet” nozzle attachment. It concentrates the stream for good cleaning power without the destructive force. Pair that with a stiff scrub brush, and you have a winning combo for most jobs.
This leads to another common question: is it necessary to drain the pool to clean the tiles? For cleaning the tile line above the water, almost never. You can work on that area with the pool full.
Draining a pool is a major step reserved for full-surface restoration or replastering, not routine stain removal. It’s a big job that should be left to professionals.
Post-Treatment Recovery and Drying
Once you’ve worked on a stain, the next steps are critical. You must rinse the area extremely well. Any leftover cleaning solution can dry into a new, sticky film or even etch the surface. That thorough rinse also helps prevent stains after washing by removing residues that could re-deposit. This helps keep fabrics looking clean after washing.
I use the hose to flush the spot for a good 30 to 60 seconds, making sure all residue is washed back into the pool water (which helps dilute it).
Then, let it air dry completely. Sun exposure is great for tiles and helps the process. For coping, like the travertine around my Aunt Jessica’s pool, full sun is fine but can cause natural stone to fade slightly over many years.
The true test is to check the spot once it’s bone dry, not while it’s wet. A wet tile often looks uniformly dark, hiding any leftover stain. When dry, the color should be even. If a shadow of the stain remains, you know you need another treatment round.
Keeping Stains at Bay: Practical Prevention Habits
The best way to handle stains is to stop them before they set. How can you prevent future staining on your pool tiles and coping? It’s about consistent, simple care and using appropriate cleaning methods for different types of stains.
My routine is built on three pillars:
- Maintain Your Water Chemistry: This is the biggest one. Balanced pH and alkalinity prevent scale (chalky white deposits) and metal stains. Test your water weekly.
- Skim and Remove Debris Daily: Leaves, pollen, and dirt don’t just make the pool look messy. As they sit on the waterline tile, they decompose and stain. I grab the skimmer while the kids are swimming.
- Brush the Tile Line Weekly: This is the golden habit. A quick once-over with a tile brush breaks up the invisible film of oils, sunscreen, and minerals before it hardens into a stain.
How often should you clean the tiles and coping to prevent staining? I follow a two-tier system. A quick weekly wipe-down takes me five minutes. Then, 1-2 times per swimming season, I do a deeper clean with my pH-neutral tile cleaner.
I call my weekly habit the “Friday five-minute scrub.” While Jason and his buddy Edward are doing cannonballs, I walk the perimeter with my brush. It’s easy, and it keeps those stubborn rings from ever forming.
When NOT to Try This: Calling a Professional
DIY has its limits. Knowing when to call for help protects your pool and your wallet from bigger problems.
You should consider a professional for:
- Widespread staining across most of the pool tile.
- Any damaged, cracked, or loose tiles.
- If you are unsure what your coping material is (this changes the cleaning approach).
- If you’ve tried all the gentle DIY methods and the stain laughs at you.
A pool pro has tools we don’t. They might use soda blasting, which is gentler than sand, or a controlled acid wash for severe scale. These jobs almost always require draining the pool, which is a major procedure.
Calling a professional is a smart move, not a failure. I learned that after a stubborn stain on my own pool defeated me. Getting the right fix the first time is true TLC for your pool.
FAQ about Removing Stains from Your Pool Tiles and Coping
What is the safest method to start cleaning before I try any chemicals?
Always begin with the gentlest option: a soft-bristled brush and a solution of warm water with a few drops of dish soap. This combination safely lifts most organic grime and sunscreen oils without risking damage to the tile’s surface or grout.
What safety precautions are absolutely essential when using chemical cleaners?
Never mix different cleaning chemicals, especially chlorine and acid, as this can create dangerous gas. Always work in a well-ventilated area, wear gloves and eye protection, and meticulously rinse the area with plenty of water after application.
Can I use a pressure washer, and if not, what’s a good alternative?
Using a high-pressure washer is risky as it can erode grout and damage tile surfaces. A much safer and effective alternative is a standard garden hose fitted with a concentrated “jet” or “turbo” nozzle attachment for targeted cleaning power.
What should I do immediately if a cleaning method isn’t working on a stubborn stain?
First, stop aggressive scrubbing to avoid surface damage. Re-evaluate the stain type using a simple test (like the vitamin C trick for metals) and switch to a targeted, pool-safe commercial product designed for that specific stain category, following its label exactly.
What is the single most important habit to prevent stains from forming?
Consistently maintaining balanced pool water chemistry is the top priority, as it prevents both mineral scale and metal stains. Complement this with a quick, weekly brush of the waterline tile to break up invisible films of oils and debris before they harden.
Stain-Free Tiles All Season Long
Treat pool tile stains immediately with a safe, pH-balanced cleaner to stop them from becoming a permanent eyesore. I share my real-world tests and family-trusted methods regularly, so stick with me here on the blog for more straightforward care tips.
Written by Suzanne Rosi Beringer. Suzanne is an accomplished chemist, laundry expert and proud mom. She knows the science and chemistry of stains and has personally deal with all kinds of stains such as oil, grease, food and others. She brings her chemistry knowledge and degree expertise to explain and decode the science of stain removal, along with her decades long experience of stain removal. She has tried almost everything and is an expert on professional and DIY stain removal from clothes, fabric, carpet, leather and any other items dearest to you.