How to Remove Green Algae from Pool Surfaces and Stop It for Good
That slimy green film on your pool walls isn’t just ugly; it’s a sign your water balance is off. You can clear it up by brushing aggressively, shocking the water, and then meticulously cleaning your filter.
This article walks you through my proven method, covering:
- The specific tools and non-toxic chemicals I keep on hand
- A step-by-step cleaning process from scrub to vacuum
- How to tackle stubborn algae hiding in corners and on steps
- The simple weekly test that prevents algae from coming back
- When to seek professional help for persistent problems
As a long-time stain and surface care expert, I’ve handled everything from my dog’s muddy paws to the green pool my son Jason and his buddy Edward swam in last summer.
First Response: What to Do the Moment You Spot Algae
Take a deep breath. Seeing that first green cloud can be a gut punch.
I get it. You just want to dump a gallon of chlorine in and run. Resist that urge. A calm, methodical start saves time and money.
Your first move should be to the equipment pad. Open the skimmer basket and the pump strainer pot.
Clear out any leaves or debris. This protects your pump and ensures maximum water flow for the battle ahead.
Now, grab your pool brush. Don’t reach for the chlorine jug yet.
Brushing the walls and floor is more critical than adding chemicals at this very moment. Algae forms a protective slime layer. Brushing breaks that layer apart, exposing it to the sanitizer you’ll add next.
Let me tell you about our last algae scare. Jason had his whole soccer team over. Between the sunscreen, sweat, and a few stray juice boxes, the chemistry got overwhelmed. Two days later, the pool had a faint green tint.
I brushed everything first, feeling that slick film give way. It made the shock treatment I did next work twice as fast.
Finally, test your water. My simple liquid test kit lives in the pool shed.
Focus on pH first. Adjust it to the 7.2 to 7.6 range. Getting your pH right can make your chlorine up to five times more effective against algae. It’s the ultimate force multiplier.
The Complete Clean-Out: Step-by-Step Pool Algae Removal
This is your full battle plan to clear a green pool. Follow these steps in order.
Step 1: Balance the Water
You can’t fight algae in a chaotic environment.
Test and adjust your Total Alkalinity first (aim for 80-120 ppm). This stabilizes your pH. Then, correct your pH to 7.2-7.6. This step isn’t glamorous, but it’s non-negotiable.
Step 2: The “Shock and Awe” Super-Chlorination
Now you bring in the big guns. Shocking means raising chlorine to a very high level to kill organic matter.
For algae, you need a dose meant for an outbreak. Follow the “breakpoint chlorination” dosage on your shock product’s label.
Choose your shock type carefully.
- Calcium Hypochlorite (Cal-Hypo): My usual go-to. Powerful and affordable. It adds calcium, so don’t use it if your water is already hard.
- Sodium Dichlor: A good choice if your stabilizer (CYA) level is low. It dissolves quickly and adds stabilizer.
Always add shock in the evening. Sunlight burns off unstabilized chlorine.
Step 3: Strategic Brushing
After adding shock, wait about an hour for it to circulate.
Then, brush every single surface again. Walls, floor, steps, and especially the corners and behind the ladder. This is where algae hides.
If you feel like you “can’t get algae out of pool” in certain spots, it’s almost always because brushing was missed there. That slick biofilm shields the algae colony from the chlorine.
Step 4: The Clean-Up Crew
Let the filter run continuously for at least 24 hours. This is mandatory.
Once the water turns from green to a cloudy grayish-blue, the algae is dead. Now you need to remove the carcasses.
Vacuum the pool. For a severe bloom, vacuum slowly and directly “to waste.” This bypasses your filter, sending the dead algae out of the pool. Be cautious when using chlorine, especially when it comes to sensitive materials like sea salt hair braids.
Step 5: The Final Polish
Your water might still be hazy with fine, dead algae particles.
This is when I use a clarifier. It clumps those tiny particles together so your filter can catch them.
For extreme cloudiness, a flocculant is stronger. It sinks everything to the bottom for you to vacuum to waste.
Step 6: The All-Clear Test
How do you know it’s safe? Test twice.
First, your chlorine level must have held overnight. If you lose more than 1.0 ppm of chlorine after sunset, the fight isn’t over.
Second, the water should be clear, with no visible algae. The pool floor should look crisp, not shadowy.
Only when both tests pass should you let anyone back in. For us, that means Jason can start planning his next pool party.
Understanding the Enemy: Algae Stain Science & Urgency
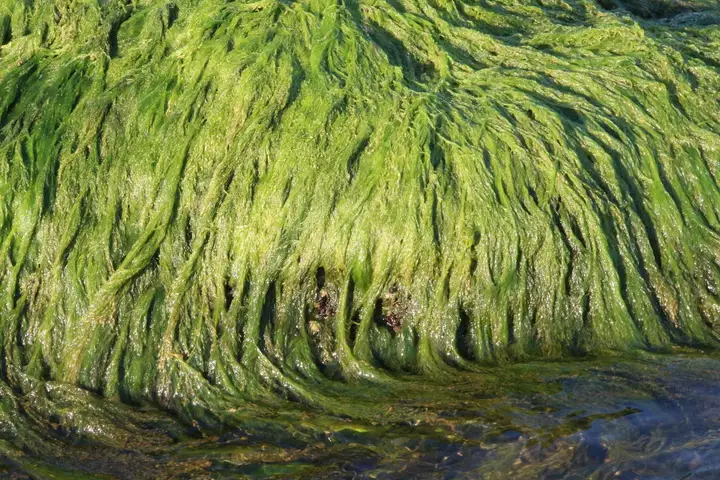
Chemistry Corner: What Is Algae, Really?
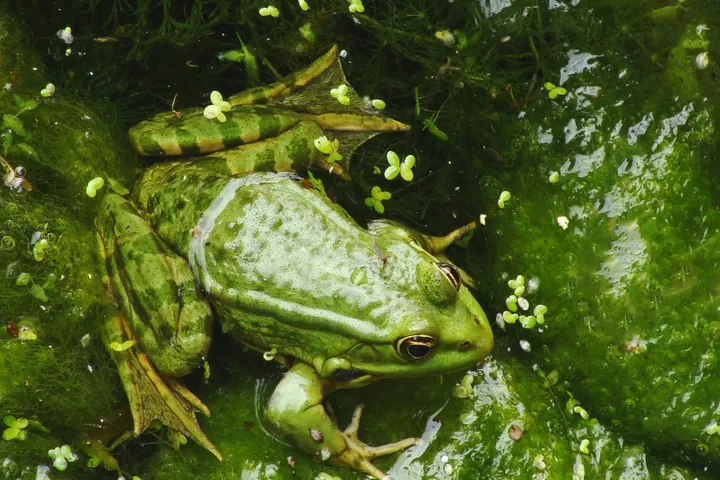
Think of algae not as a simple stain, but as a tiny, green garden growing in your pool. It’s a living organic stain, just like the grass stain on Jason’s soccer shorts or a biological stain on fabric. It’s alive.
The core of the cleaning process is oxidation, where a chemical like chlorine breaks apart the algae cells to make them harmless. It’s the same idea as using hydrogen peroxide on a grass stain. The oxidizer attacks the color and structure of the organic matter.
This is exactly why you treat it the same way you’d tackle “how do you get algae out of a fish tank.” You’re using chemistry to disrupt a living organism, not just wipe away a spill.
Panic-Level Assessment: Your Golden Window
On a stain panic scale of 1 to 10, I rate a new algae patch at a solid 6. It’s not a red wine spill on a white couch, but you cannot ignore it.
Your “Golden Window” to stop a full-blown takeover is usually 24 to 48 hours. A few small, slimy patches on a Friday can turn your entire pool into a murky green pond by Sunday afternoon.
This window shrinks fast. After a heavy rainstorm that washes in nutrients, or when Roger’s hunting buddies visit (all that sunscreen and body oils introduce phosphates algae love), you might only have a day.
Surface-Specific Tactics: Liner, Tile, Concrete & More
You can’t use the same brush or chemical approach on every surface. This chart is your quick-reference guide to avoid damage.
| Surface Type | Best Brush | Key Cautions |
| Vinyl Liners | Nylon brush only. Be gentle. | Never use metal brushes-they puncture. Never pour granular shock or chlorine directly onto a dry liner; it can bleach or weaken the material. Always pre-dissolve. |
| Plaster/Gunite | Stiff nylon or a dedicated pool brush for textured surfaces. | Algae can stain porous plaster if left to grow. Aggressive brushing is needed to scrub it out of the rough surface texture. |
| Fiberglass | Soft nylon brush or a soft-bristled car wash brush. | The goal is to avoid scratching the smooth gel coat. A soft touch and the right chemicals do the work, not abrasive force. |
| Concrete Decking | Stiff push broom or deck brush. | This is a separate outdoor stain issue. A diluted bleach solution or a dedicated concrete cleaner works well. Always rinse the dirty solution away from the pool water to avoid feeding more algae. |
Field Note from me: For textured pool floors or steps, I keep a handheld stainless steel brush in my kit. Its stiff, focused bristles are the only thing that gets a real grip on those stubborn, slimy spots without harming the underlying plaster. My Aunt Jessica from Arizona taught me that trick for her old pool.
What Not to Do: Critical Warnings & Material Red Flags
Getting rid of algae makes you want to fight dirty.
Some shortcuts cause more damage than the green gunk itself. I learned this the hard way one summer.
Never Use Household Cleaners in the Pool
My Aunt Jessica once suggested using a splash of dish soap to “cut the grease.”
This is terrible advice for your pool water. Products like Comet, bleach cleaners, or dish soap are formulated for sinks and tubs, not thousands of gallons of delicate water. Particularly when dealing with pool tiles and coping, it’s essential to use the right cleaners to avoid damage.
They introduce phosphates, foaming agents, and unknown chemicals that destroy your water balance and feed future algae blooms.
Keep them on the deck, not in the water.
Never Pressure Wash a Vinyl Liner
The force seems perfect for blasting away slime.
It will also blast a hole right through your liner. The high-pressure stream can puncture, tear, or weaken the material instantly. My husband Roger found this out on our old above-ground pool.
Use a soft brush and elbow grease instead.
Never Mix Pool Chemicals Directly
Mixing dry acid and chlorine granules in a bucket is asking for a toxic, explosive reaction.
Always add each chemical to the pool water separately, following the label directions to the letter. Pre-dissolve granules in a bucket of pool water first.
This isn’t a chemistry experiment you want happening on your patio.
Never Shock with the Pool Cover On
It traps chlorine gases.
This can bleach and degrade a solid cover, and it prevents the sun from helping the process. Always shock with the cover off, ideally in the evening.
Post-Treatment Recovery: A Crucial Final Step
You’ve brushed, shocked, and filtered. The water looks blue.
Your job isn’t done yet. After a major shock treatment, you must let the filter run continuously for at least 24 hours.
Test the water again. The chlorine level needs to come back down below 5 ppm before it’s safe to swim.
The sun is your partner here, naturally breaking down the residual chlorine. Don’t consider the battle won until your water tests are perfectly balanced.
Keeping It Crystal Clear: How to Prevent Algae from Coming Back
Think of prevention as a simple weekly check-in, not a dreaded chore.
A small, consistent effort saves you from the weekend-long “green swamp” crisis. This is how you stop asking “how do you prevent green algae from coming back?”
Tip 1: Consistent Water Testing
Make it a ritual. Every Saturday morning with my coffee, I test.
I use a simple test strip kit to check chlorine, pH, and alkalinity. Keeping these in their happy ranges makes your pool a hostile place for algae. Chlorine can stain the hair of swimmers, particularly blondes, after extended exposure. This is another reason to consider protective measures for swimmers while you keep those levels in check.
A weekly two-minute test gives you total control and saves money on chemicals.
Tip 2: Proactive Shock Treatment
A weekly “maintenance shock” is like a flu shot for your pool.
Use about half the dose you would for a full algae attack. It burns off contaminants before they can organize into a green army.
This small, regular dose is far easier than the massive, expensive crisis dose.
Tip 3: Regular Physical Cleaning
Brushing isn’t just for outbreaks.
Every week, give the walls and floor a good brush with a firm brush (I love my Wall Whale for the leverage). Vacuum up what you stir up.
Skim leaves and debris daily. This stops organic material from rotting and feeding algae, and it also prevents other problems like pollen stains.
Tip 4: Filter Care is Non-Negotiable
Your filter is the pool’s kidney.
If it’s clogged, it can’t trap algae spores. Backwash your sand or DE filter when the pressure gauge rises 8-10 psi. Rinse cartridge filters with a hose every few weeks.
A clean filter runs stronger and saves your pump from overworking.
Tip 5: Use an Algaestat
After shocking each week, I add a dose of polyquat-based algaecide.
It doesn’t kill algae. Instead, it forms a gentle protective barrier that prevents spores from taking root.
Think of it as a microscopic shield on your pool surfaces.
Tip 6: Manage Contaminants at the Source
Everything that goes in feeds algae.
Ask swimmers to rinse off lotions and sweat. Keep yard debris cleared. My dog Peeta loves to drink from the pool, which introduces organics.
I keep a separate bucket of fresh water for him now. It helps a lot.
Safe DIY Deck Cleanup
For algae spots on the concrete deck, you don’t always need harsh chemicals.
My mom Martha taught me this. Make a thick paste of baking soda and water.
Scrub it onto the slimy spots with a stiff brush. Let it sit for 15 minutes, then rinse. It lifts the algae without damaging the surface or harming nearby plants.
My Go-To Product Shortlist
After years of testing, these are the categories I trust. Specific brands vary by store.
| Category | What to Look For | Why I Use It |
| Shock | Granular Calcium Hypochlorite | It’s potent, dissolves well, and gives a reliable chlorine boost. |
| Liquid Chlorine | Plain, unscented bleach (check strength) | Great for quick, daily chlorine adjustments without raising calcium. |
| Algaecide | It’s non-foaming and works as a preventive barrier, not just a killer. | |
| Test Kit | Liquid reagent kit or reliable strips | Accuracy is everything. A good test kit is your most important tool. |
| Brush | A “Wall Whale” or angled brush | The head angle makes brushing walls effortless, so you’ll actually do it. |
Beyond Pools: Tackling Pollen & Aquarium Algae
The principles for a clean pool-balance, scrubbing, and filtration-apply to other watery messes too.
I see it with my son Jason’s soccer gear and our dog Peeta’s muddy paws. The same logic helps elsewhere.
How Do I Get Pollen Out of My Pool?
Pollen forms a fine, yellow film on the water’s surface. It feels slick, not slimy like algae.
Treat pollen as a surface contaminant, not a living growth, so shock treatments won’t work.
My method is straightforward. I boost my filtration first.
- Use a skimmer sock. It catches that powdery pollen before it sinks.
- Add a pool clarifier. This clumps tiny particles so the filter can grab them.
- Run the filter extra hours for a day or two. Clear water needs time.
It’s like dealing with dust after Roger mows the lawn. You contain it and filter the air.
How Do You Get Algae Out of a Fish Tank and Clean Aquarium Decor?
Aquarium algae is a cousin to pool algae. It loves light and excess nutrients.
The fight is always the same: physically remove it, starve it, and keep your water balanced.
For decor, manual scrubbing is your first move. I use a brand-new, soft-bristle toothbrush reserved for cleaning mold surfaces on vents.
Scrub decorations in a bucket of removed tank water. Never use soap. It will harm your fish.
To stop algae from coming back, control its food source.
- Reduce light. Cut back on how long the tank light is on each day.
- Limit nutrients. Do not overfeed your fish. Vacuum the gravel weekly.
- Maintain “sanitizer.” In a tank, this means a healthy colony of beneficial bacteria to out-compete algae.
Think of it like managing snacks for my kids. If I leave juice boxes and crackers everywhere, I get crumbs and sticky spots. Control the source, and the mess stops.
How Do You Get Ammonia Out of a Fish Tank?
Ammonia is not a stain. It is a dangerous chemical imbalance in the water.
This is a water chemistry emergency, similar to a pool’s pH crashing to a damaging level.
You fix it with water changes and biology, not scrubbing.
Perform a partial water change immediately, about 25-50%. Use a water conditioner to neutralize chlorine.
Ensure your tank is fully “cycled.” This means allowing beneficial bacteria to grow so they consume ammonia. It takes patience.
Test your water regularly with a liquid test kit. It is the only way to know what is happening.
My aunt Jessica in Arizona has a koi pond. We use the same ‘balance, scrub, filter’ logic, just with pond-safe products.
Whether it’s pool pollen or tank algae, the core idea is consistent. Manage the environment, and the cleanup gets much easier.
FAQ About Removing & Preventing Pool Algae
Can I use vinegar or bleach to scrub algae off the pool walls?
No. While these are effective household cleaners, they should never be added to your pool water. They introduce unknown chemicals and phosphates that can severely upset your water balance and fuel future algae growth. So, no matter if oxi-clean or any other cleaner, never use them in pool water.
I’ve brushed and shocked, but a slimy film remains. What’s wrong?
The algae’s protective biofilm is likely still intact. Ensure you’re using a brush stiff enough for your pool surface (like a stainless steel brush for textured plaster) and scrub every corner thoroughly to break the slime layer so the chlorine can attack the algae. That same approach applies to other water sources: proper chlorine management helps reduce coliform bacteria. Thorough disinfection helps keep drinking water safe.
What’s a safe, quick way to clean algae off my pool deck?
For concrete decking, use a diluted outdoor bleach solution or a paste of baking soda and water. Scrub with a stiff broom and always rinse the runoff away from the pool to avoid introducing nutrients back into the water. For stubborn stains, such as rust, follow specific techniques designed to remove rust stains from concrete surfaces.
How long after a shock treatment can my family swim safely?
You must wait until the chlorine level drops below 5 ppm, which typically takes 24 hours. Always confirm this with a test kit, and ensure the water is clear with no visible algae before allowing anyone back in the pool.
How can I tell if my green water is algae or just pollen?
Algae feels slippery and clings to walls, while pollen is a powdery film on the surface. Treatment differs: pollen requires enhanced filtration and clarifiers, while algae demands immediate brushing and super-chlorination (shocking) to kill the living organism.
Keeping Your Pool Sparkling and Algae-Free
When green algae appears, a powerful shock treatment followed by diligent brushing is your best move. Stopping it for good, though, hinges on weekly water testing and balanced chemicals-a routine my husband Roger swears by for our own pool. For more real-life stain and surface care stories, keep following along right here on Stain Wiki. In upcoming guides, we’ll show you how to remove algae rust stains from your pool liner.
Suzanne is an accomplished chemist, laundry expert and proud mom. She knows the science and chemistry of stains and has personally deal with all kinds of stains such as oil, grease, food and others. She brings her chemistry knowledge and degree expertise to explain and decode the science of stain removal, along with her decades long experience of stain removal. She has tried almost everything and is an expert on professional and DIY stain removal from clothes, fabric, carpet, leather and any other items dearest to you.