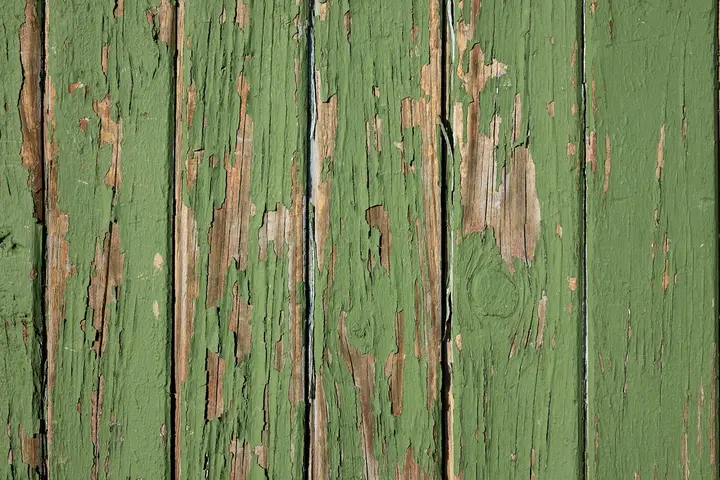
How to Remove Grease Stains from Wooden Furniture and Other Wood Surfaces?
That oily spot on your wood table or cabinet can be fixed. Act fast by sprinkling cornstarch or baking soda to absorb fresh grease before it soaks in.
Here’s what I’ll walk you through:
- Blotting up fresh spills the right way
- Using pantry staples like vinegar and dish soap
- Treating old, set-in stains safely
- Caring for different finishes from polished to unfinished wood
I’ve tested these methods for years on my own furniture, from bacon splatters on the kitchen table to greasy handprints from my kids.
Grease on Wood? Stay Calm and Assess the Situation
Last week, my son Jason left a perfect set of greasy handprints on our oak dining table after devouring a pepperoni pizza. I sighed, but I didn’t panic. Grease happens to everyone.
For a fresh spill like Jason’s, I give it a panic-level of 3 out of 10. For an old, dark stain that’s been sitting for months? That’s a 7 out of 10. The difference is your “Golden Window”.
You have a good 24 to 48 hours before fresh grease soaks deep into the wood fibers and starts to harden. Act within this window, and you’re golden.
The absolute first thing to do is grab a plain paper towel or a clean, white cloth. Gently press it onto the spill to soak up any wet, excess grease. Do not rub it.
Blotting lifts the grease away. Rubbing grinds it in and spreads the stain wider. I learned this the hard way with a butter stain from my Labrador Peeta’s sneaky counter surfacing.
Before you treat anything, you must identify your wood. Is it finished with a shiny polyurethane coat? Is it unfinished and porous? An antique heirloom? An oiled butcher block?
This is the step where you always do a hidden test patch, like on the underside of a table or inside a cabinet door. Your method changes completely based on the surface.
Your Go-To Grease-Fighting Kit: Safe Solutions to Have On Hand
Fighting grease doesn’t require harsh chemicals. My mom Martha in North Texas taught me to raid the pantry first. Here’s my simple, non-toxic arsenal.
Dish Soap (The First Defender)
Yes, you can absolutely use dish soap on wood. It’s designed to cut grease. I use a plain, clear liquid soap like Dawn.
Mix a drop with a cup of warm water. Dampen a soft cloth, wring it out well, and gently circle the stain. This mild solution works wonders on fresh grease spots on finished wood. It also translates well to removing oil grease stains from clothes, using the same gentle technique. Always dry the area immediately with another cloth.
White Vinegar (The Cutting Cutter)
Vinegar helps by breaking down the oily bonds and lifting the residue. It’s a gentle acid that won’t damage most finishes.
I mix equal parts white vinegar and water. Dampen a cloth, wipe, and dry. How does vinegar help? It dissolves the sticky grip of the grease, making it easier to wipe away. The smell fades fast.
Baking Soda or Cornstarch (The Dry Absorbers)
For a small, fresh spill, try a dry approach. Sprinkle baking soda or cornstarch right onto the grease. Let it sit for an hour. This method works particularly well for oil-based automotive stains.
The powder will turn clumpy as it absorbs the oil. Brush it away with a dry cloth. This is a fantastic, zero-risk first step for delicate surfaces. My aunt Jessica in Arizona uses this for her olive oil splatters.
Mineral Spirits or Rubbing Alcohol (For Stubborn Spots)
For old, set-in stains, you need a solvent. I keep a small bottle of odorless mineral spirits or 70% isopropyl alcohol.
Dab a tiny amount on a cloth and test it. Gently rub the stain. These solvents break down hardened grease without raising the wood grain like water can. Use with plenty of ventilation.
Commercial Wood Cleaner or Degreaser (The Heavy Artillery)
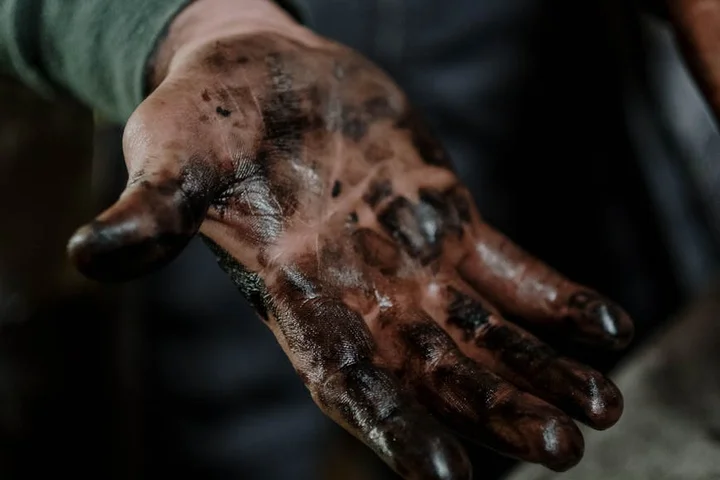
For a severe, widespread mess-like my husband Roger’s engine grease on the workshop bench-I use a product made for the job.
I follow the label directions exactly. A commercial degreaser is formulated to tackle polymerized grease without harming the wood’s finish. It’s my last resort, but it works.
Now, about that odd trick. Can mayonnaise really remove grease stains? I was skeptical, but I tested it on a scrap of walnut. It didn’t perform any better than the specialized stain removers for fabric.
The science is oil-in-oil; the mayo’s oils can sometimes loosen the stain’s oils. It left a greasy smear I then had to clean. For a precious antique, introducing more oil is a risky last resort I wouldn’t recommend. Stick to the methods above.
Surface Compatibility Chart
- Hard Wood Surfaces (Tables, Cabinets, Floors): Use all the methods listed above, starting with the gentlest option. Always test first.
- Fabric or Carpet: This is a different game. Here, you’d blot, apply diluted dish soap, rinse with a damp cloth, and let air dry. Never soak wood-like methods into fabric.
- Car Interior (Plastic/Vinyl): A damp cloth with a drop of dish soap works well. Avoid vinegar or solvents on sensitive materials.
The Step-by-Step Cleanup: How to Get Grease Out of Wood
My kitchen table sees it all. Bacon spatter from Roger’s Saturday breakfast, butter drips from Jessica’s toast, and the oily smear from a pizza box my son Jason left behind. I use this same gentle process on all of it.
- Blot up any excess grease immediately with a paper towel. Press, don’t rub. You want to lift the puddle, not grind it deeper into the grain.
- Mix a few drops of clear dish soap (I always keep a blue Dawn bottle under my sink) into a cup of warm water. Swirl it to make it sudsy.
- Dampen a soft, white cloth in the solution. Wring it out until it’s just damp, not dripping wet.
- Gently wipe the stained area, moving your cloth in the direction of the wood grain to avoid creating tiny scratches.
- Rinse your cloth with clean water, wring it out, and wipe the area again to remove soapy film.
- Dry the spot thoroughly right away with a clean, absorbent towel. Lingering water causes white rings, which is a whole other problem.
This works for most fresh spills on common sealed wood. If a shadow of the grease remains, don’t worry. We go deeper. The same approach also applies to concrete stain removal for oil spills. On concrete, you’ll often start with gentler steps and work toward deeper treatment as needed.
Step 1: The Gentle Wash (For Fresh Stains)
This is your first and best response. That dish soap is a degreaser for a reason. It breaks the bond between the oil and the wood’s surface. The key is a light touch. I pretend I’m washing a delicate plate, not scrubbing the driveway. A sopping wet cloth forces water under the finish. A damp one cleans the top.
Always dry the wood faster than the air can, using a soft towel and some pressure. I sometimes follow up with a hairdryer on the cool setting held a foot away, just to be sure.
Step 2: The Deeper Clean (For Lingering Shadows)
Sometimes grease leaves a faint, dull patch. You need to lift it from the tiny pores of the wood. You have two great, non-toxic options here.
Option A: The Vinegar Rinse. Mix equal parts white vinegar and water in a spray bottle. The sharp, clean scent tells you it’s working. Lightly mist the stain and wipe with a damp cloth, following the grain. Vinegar cuts through the leftover oily film.
Option B: The Baking Soda Paste. This is my go-to for a slightly textured, older stain. Mix baking soda with just enough water to make a spreadable paste, like wet sand. It will feel gritty. Smear a thin layer over the stain and let it sit for ten minutes. The paste acts like a magnet, drawing the oil up and out. Wipe it away with your damp cloth.
Step 3: The Final Rinse and Dry
This step is non-negotiable. Any cleaner left on the wood can attract dirt or damage the finish over time. After using soap, vinegar, or baking soda, you must rinse.
Dampen a fresh cloth with plain water, wring it out well, and wipe the entire treated area. Immediately dry it with a towel. Go over it twice. If you’re cleaning a table leg or vertical surface, I’ll even use that cool hairdryer to ensure no moisture settles into joints or carvings.
For old, set-in grease stains that laugh at these methods, you may need to repeat the process or use a solvent like mineral spirits on a hidden spot first. Test it. Use it sparingly. And ventilate the room well.
Special Wood, Special Rules: Adapting Your Approach
Wood isn’t one thing. Think of it like fabric. Finished wood is like a raincoat, the water and oil mostly bead up on top. Unfinished wood is like a cotton t-shirt, it soaks up everything instantly. You clean them very differently.
Finished Wood (Tables, Cabinets, Floors)
The polyurethane or lacquer finish is your best friend. It creates a barrier. My whole process above is designed for this. For kitchen cabinets near the stove, I do the gentle soap wash monthly to prevent sticky, yellowing grease buildup.
For wooden floors, the same rules apply but faster. Grease from cooking can land on them. I mix my soap solution in a spray bottle, mist a small area, wipe with a microfiber mop, and dry immediately with a towel. Letting any liquid sit is the enemy.
Unfinished or Oiled Wood (Cutting Boards, Some Furniture)
This is where you must be cautious. There’s no plastic-like sealant protecting the wood. My mother-in-law Brianna, from Southern Texas, taught me her method for her beloved butcher block.
For a cutting board with bacon grease or oil stains, she sprinkles a thick layer of coarse salt or baking soda directly onto the stain. Then, she cuts a lemon in half and uses it like a scrubber, squeezing juice as she rubs. The abrasive salt and acidic lemon juice lift the grease. Rinse quickly under running water, dry it standing up, and oil it later. Never, ever soak it.
Antique or Delicate Wood
Here, your first tool is patience, not a wet cloth. I learned this from a small stain on an old cedar chest from my mom, Martha.
Start dry. Cover the grease spot with cornstarch, talcum powder, or even flour. Let it sit for hours, even overnight. The powder will absorb a shocking amount of the oil. Brush it away. Repeat. If a shadow remains, use the tiniest dab of mineral spirits on a cotton swab in a hidden corner to test. Often, the dry method is enough. Modern cleaners and water can cloud old varnishes or lift veneers, so dry absorption is always the safest first step.
For commercial products, I look for ones labeled specifically for wood that are pH-neutral. Even then, I test them on a bottom drawer slide or the back of a leg. What works on my modern table could ruin an antique finish.
Critical Warnings: How Not to Damage Your Wood
My mom Martha always told me one thing about wood care. Wood and excess water are permanent enemies, and treating them otherwise is asking for trouble. This isn’t just an old saying. I’ve seen a beautiful butcher block ruined by a well-meaning but soggy cleanup.
Think of water like an unwelcome houseguest for wood. It soaks in, swells the fibers, and never really leaves the same way.
Your “Never-Use” Checklist
Before you touch that grease spot, memorize this short list. These tactics cause more harm than the original stain.
- No abrasive scrub pads. The green side of a sponge or a steel wool pad will scratch the protective finish right off. Once that seal is broken, stains sink in deeper.
- No harsh ammonia or bleach-based cleaners. These chemicals don’t cut grease well on wood. Instead, they often react with the finish, causing a cloudy white haze called “blushing” that’s very hard to fix.
- No pouring cleaner directly on the wood. Always apply your solution to a cloth first. Pouring it on lets liquid pool and seep into seams and cracks.
- No letting water pool. If you see a shiny puddle, you’ve used too much. Wipe it dry immediately with a clean, absorbent towel.
Understanding the Real Risks
So, what actually happens if you ignore these rules? The risks are very specific. Damaging the finish is the most common result, leaving the wood underneath vulnerable to every future spill. That whitening or “blushing” I mentioned is a chemical reaction in the varnish or lacquer.
Warping is a slower, sneakier problem. Water soaks into the wood grain, making it expand unevenly. My husband Roger’s garage workbench has a slight bow from an old oil can leak we didn’t clean up fast enough. The board never flattened back out.
The single most important rule is this: always, always test your cleaner in a hidden spot first. I test on the back of a table leg, inside a cabinet door, or underneath a chair seat. Wait a few minutes. If the finish stays clear and smooth, you’re good to go.
Future-Proofing: Keeping Grease Stains Off Your Wood for Good
After you’ve tackled a tough grease stain, you’ll want to prevent the next one. Shifting to a proactive, easy-care mindset makes wood care simple instead of stressful. Wood is durable, but it appreciates a little foresight.
Simple Shields for Daily Life
The best defenses are physical barriers. Make coasters, trivets, and tablecloths non-negotiable for messy meals or projects. We keep a stack of trivets by the stove because bacon grease splatters are a weekend tradition.
For Roger’s garage workbench, where motor oil and grease are constant threats, a simple vinyl tablecloth or a dedicated silicone mat creates a perfect, wipe-clean barrier. It saves the wood underneath from becoming a permanent stain magnet.
The Power of a Simple Routine
Grease stains often start as invisible, sticky dust. A quick weekly dusting with a dry microfiber cloth, followed by an occasional wipe with a cloth barely dampened with water, prevents that grimy buildup. My aunt Jessica taught me this. She says a clean surface has no “grip” for new grease to stick to. Surfactants and emulsifiers lift grease by breaking it into tiny droplets that water can wash away. That’s why cleaners with emulsifiers can remove grease stains more effectively.
It takes two minutes. I do it while the kids are putting their shoes on. This habit alone has saved our dining table from countless sticky handprints and pizza box rings.
Boosting Your Defenses
For high-use surfaces like your kitchen table, consider a renewable shield. Reapplying a protective paste wax or furniture polish every few months creates an easier-to-clean barrier. It fills in microscopic gaps in the finish.
My mother-in-law Brianna swears by a specific paste wax for her heirloom pieces. It doesn’t make the wood bulletproof, but it gives you those crucial extra seconds to blot up a spill before it becomes a stain.
Wood is meant to be lived with and loved. With these simple habits, you can enjoy your wooden furniture without the constant fear of a new stain. It’s all about gentle, consistent care.
FAQ about Removing Grease from Wood
How can I protect my kitchen table from future grease stains?
Use trivets, coasters, and tablecloths as physical barriers during messy meals. For ongoing protection, apply a quality paste wax or furniture polish every few months to create an easy-to-clean surface.
What’s the biggest risk of damaging my wood when cleaning grease?
Using too much water or liquid cleaner is the most common mistake, as it can seep into the wood, causing warping or white rings. Always apply cleaner to a cloth first, not directly onto the wood, and dry the area thoroughly immediately after cleaning.
What’s the key difference between cleaning grease from finished vs. unfinished wood?
Finished wood has a protective seal, so you can safely use a damp cloth with mild soap. Unfinished or oily wood is porous, so you must start with a dry absorbent like cornstarch and avoid letting it get wet, rinsing only if necessary and drying it instantly.
What’s the best quick method for grease splatters on kitchen cabinets?
For routine cleaning, wipe cabinets near the stove with a cloth dampened with a drop of dish soap in warm water, then immediately dry. For built-up grease, use a vinegar-water solution on a cloth, following the grain, and dry thoroughly. Make sure to also clean any burnt grease stains on your electric stove to keep your cooking area spotless.
Is it safe to use the lemon and salt method on my wooden cutting board?
Yes, this is a classic and safe method for unfinished butcher blocks and cutting boards. The abrasive salt and acidic lemon juice lift grease; just rinse quickly under running water and stand the board up to dry completely before re-oiling.
Keeping Wood Surfaces Safe and Clean
Your most powerful tool is a dry cloth for quick blotting-it pulls up grease before it can soak in and damage the wood. Remember to start gentle with a soapy water solution; it’s the same reliable method I use on our kitchen table after Jason’s oily pizza nights. For more step-by-step guides from my home to yours, follow along right here on the blog.
Suzanne is an accomplished chemist, laundry expert and proud mom. She knows the science and chemistry of stains and has personally deal with all kinds of stains such as oil, grease, food and others. She brings her chemistry knowledge and degree expertise to explain and decode the science of stain removal, along with her decades long experience of stain removal. She has tried almost everything and is an expert on professional and DIY stain removal from clothes, fabric, carpet, leather and any other items dearest to you.