How Do You Get Cat Urine Stains and Odor Out of Upholstered Furniture?
That sharp, lingering smell can feel like a permanent mark on your favorite couch, but I promise you can fix this. The real solution requires a simple two-part attack: first, an enzyme cleaner to eliminate the odor at its source, followed by a targeted approach to lift any lingering stain.
This guide will walk you through the exact process I use at home, from the crucial first blot to the final freshness check. You’ll learn how to accurately find every spot, why common cleaners like vinegar can make the problem worse, how to choose and use the right enzyme cleaner, my method for tackling old, set-in stains, and smart ways to prevent future accidents.
I’ve dealt with this more times than I’d like to admit, thanks to my golden retriever Peeta’s puppy days and my aunt Jessica’s wine-spilling visits, so this advice comes from messy, real-life testing.
Assess the Situation: Your Immediate Action Plan
Finding a new cat accident on your favorite chair is a special kind of household panic. Your heart sinks, and you can already imagine the smell settling in for good. I get it. Take a breath. The next moves you make are everything.
On my personal Panic-Level Assessment scale, a fresh cat urine stain is a solid 9 out of 10. You have a “Golden Window” of about an hour, maybe less, before it dries and the real trouble starts. Once those odor-causing uric acid crystals form, the battle gets much harder.
Your very first physical action is non-negotiable. Grab the most absorbent towels you have-thick cotton or a stack of paper towels-and blot, never rub, to pull the liquid up and out of the cushion. Rubbing grinds the urine deeper into the fibers and the padding below.
What if this happens when you’re not home? Say, on a friend’s light-colored sofa? I learned this trick from my Aunt Jessica after a memorable wine incident. Ask for club soda and some napkins. The carbonation can help lift a fresh spill. Pour it on, let it fizz for a moment, then blot aggressively. It’s a decent emergency patch until you can get it home for a real cleaning. This same immediate blotting method is your first move for dog pee smell out of a couch, too.
Panic-Level Assessment: How Urgent Is It?
Why is cat urine such a high priority? It’s a three-part problem. First, there’s urea, which breaks down into that sharp ammonia smell. Then there are uric acid salts-these are the tiny, nearly indestructible crystals that bind to fabric like superglue. Finally, bacteria move in, creating that lingering, musty stench. For clothing and other fabrics, that makes cat urine and dander stain removal a practical and essential skill. Getting the right approach means less lingering odor and cleaner results.
You can often judge the urgency by the stain’s color and smell. A fresh stain is usually pale yellow with a strong, sharp ammonia odor. An old, set-in stain oxidizes and turns a dull brownish-yellow, and the smell shifts to a stale, musky funk. The older it is, the more work it will take.
The Golden Window: First Steps for a Fresh Stain
If you catch it fresh, here is your exact game plan. Move fast, but don’t rush the steps.
- Blot. Press down firmly with dry, absorbent towels. Switch to a fresh spot on the towel as soon as it gets wet. Keep going until no more moisture transfers.
- Identify the extent. Gently feel the fabric and the cushion beneath. Is it damp deep down? Knowing this tells you how much cleaning solution you’ll need.
- Prepare your area. Open a window or turn on a fan. Put on rubber gloves. Gather your next-round supplies: an enzyme cleaner is ideal, but white vinegar and water will work in a pinch.
Working in a ventilated space with gloves isn’t just a suggestion-it protects you from both the bacteria and the strong odors that can give you a headache.
“On-the-Go” Emergency Fix for Public Settings
Your child points out a wet spot on the library chair where the cat carrier was. Here’s what you do without causing a scene.
- Quickly get club soda (from a café or vending machine) and a large stack of paper napkins.
- Pour a generous amount of club soda directly onto the stain. Don’t be shy.
- Let it sit and fizz for 30 seconds. The carbonation helps lift the urine to the surface.
- Layer napkins over the spot and press down with the palm of your hand, soaking up the liquid. Repeat until the napkins come back nearly dry.
This won’t eliminate the odor or stain completely. It’s a critical first aid step to prevent it from setting rock-hard before you can treat it properly at home.
Know Your Enemy: The Science of Cat Urine Stains
You wouldn’t use a butter knife to cut a steak. Knowing exactly what you’re fighting-the cat urine stain itself-helps you choose the right tool for the job every single time.
How to Identify Cat Urine Stains on Upholstery
Sometimes you smell it before you see it. Visually, look for faint yellow rings or darker patches on light fabrics. On a tan couch cushion, it might look like a shadowy, damp spot. As it fully dries, you might even see a slight, gritty, crystalline residue.
The nose knows. That sharp, eye-watering ammonia punch is a dead giveaway for fresh urine. Older urine loses that bite and develops a deeper, more unpleasant musky odor.
The real secret weapon for finding old, invisible stains is a simple blacklight flashlight. Turn off the lights and scan the furniture. Cat urine (and many other biological stains) will glow a pale yellow or greenish color. My mom, Martha, showed me this trick years ago, and it revealed a whole history on an old armchair I thought was clean.
Chemistry Corner: What Makes Cat Urine So Stubborn?
At its heart, cat urine is a complex, protein-based stain. When it’s wet, you have a chance. As it dries, the uric acid in it forms hard, salt-like crystals.
Think of it like carpenter’s glue. When wet, you can wipe it up. Once it sets and cures, it’s bonded for good. Those uric acid crystals do the same thing, binding tightly to fabric fibers. This is also why ammonia-based cleaners are a terrible idea-they mimic the smell and can actually encourage your cat to remark the spot.
While dog urine has a slightly different makeup, the core problem of urea and salts is the same. The methods that break down cat urine crystals are your best bet for dog smells too, though you might get lucky with a slightly easier cleanup.
Material Red Flags: Surfaces and Chemicals to Avoid
Be honest about your furniture. If it’s a delicate antique with silk upholstery or a priceless heirloom, your safest bet is to call a professional. Aggressive DIY cleaning can damage fragile fabrics or dyes beyond repair.
For everything else, there is a short list of “Never-Use” items for cat urine.
- Avoid ammonia-based cleaners at all costs. They signal to your cat that this is the bathroom spot.
- Do not use a steam cleaner. The intense heat will permanently set the protein and the odor into the fibers, just like cooking an egg.
- Never pour straight bleach or other harsh acids on it. They can destroy the fabric and create dangerous fumes without effectively dissolving the uric acid crystals.
And one more crucial point: use cool or lukewarm water. Hot water can cook the proteins in the urine, setting the stain and smell instantly and forever. I learned this the hard way on a rug, and the lesson stuck.
Gathering Your Tools: Safe and Effective Supplies
When you find a cat urine stain, your first instinct might be to grab whatever cleaner is under the sink. I get it. I’ve been there, staring at a cushion with Peeta looking guilty in the corner. But rushing in with the wrong tool can lock the stain and smell in forever. Think of this step not as a chore, but as building your go-to emergency kit. Having the right supplies on hand is how you clean urine from a couch effectively the first time, so you don’t have to keep revisiting the problem—unlike with cat urine stains on bedding.
What You’ll Need for Cat Urine Removal
You don’t need a chemistry lab. You just need a few smart, multi-purpose items. Here’s what I always gather before I start.
- White Cloths or Paper Towels: Colorful rags can transfer dye, making a bigger mess. White lets you see what you’re lifting out.
- Enzymatic Cleaner: This is your main weapon. It uses natural bacteria to literally eat the urine crystals, removing the odor at the source.
- Spray Bottles: I keep a few dedicated ones. One for plain water, one for a vinegar solution. They give you control.
- Distilled White Vinegar: Its acidity helps neutralize the alkaline salts in urine and tackle that sharp ammonia smell.
- Baking Soda: A fantastic, safe odor absorber. It pulls smells out of the fabric fibers after you’ve cleaned.
- A Dull Knife or Spoon: For gently scraping off any dried, crusty residue before you treat the fabric. Be gentle.
- A Wet/Dry Vacuum (if available): This is the MVP for pulling moisture out of deep cushions. If you don’t own one, blotting vigorously with towels is your next best bet.
Safe DIY Alternatives: Baking Soda, Vinegar, and More
Maybe it’s late, the stores are closed, and you need to tackle a fresh accident. My mom, Martha, taught me this two-part method for situations just like that. It’s a good temporary fix for odor and light staining, but it’s not a complete replacement for an enzymatic cleaner on old or heavy stains.
Here’s how the baking soda and vinegar team works.
- Blot up all the fresh liquid you can with paper towels.
- Sprinkle a generous layer of plain baking soda over the entire damp area. Let it sit for 10 minutes to start absorbing.
- Mix a solution of equal parts white vinegar and cool water in a spray bottle.
- Spritz the baking soda lightly. It will fizz. This reaction helps lift the stain and neutralize odors.
- Let the foam settle for 5-10 minutes, then blot everything up with a clean, damp cloth. You’ll need to repeat the blotting until the fabric is just barely damp.
For a simple surface odor on cushion covers, a paste of baking soda and a tiny bit of water can work wonders. Smear it on, let it dry completely, then vacuum it off.
For light-colored, sturdy fabrics like cotton canvas, you can try a mild oxidizing solution. Mix one tablespoon of clear, dye-free dish soap (for the oils in urine) with one cup of 3% hydrogen peroxide. Test this mix on a hidden seam first, as peroxide can lighten some dyes. Dab it on, don’t rub. Let it sit for 5 minutes, then blot thoroughly with water. This is a trick I learned after Aunt Jessica’s famous red wine incident, adapted for a different type of stain.
Recommended Products: Types of Cleaners That Work
When you can get to the store, knowing what to look for saves time and money. I keep these categories in mind.
Enzymatic Cleaners are the gold standard. They are biologically designed to solve this exact problem. Look for labels that say “contains live bacteria/enzymes,” “eliminates pet urine odors,” or “breaks down organic matter.” Follow the bottle’s instructions precisely, especially the dwell time. The bacteria need time to work. These bio enzymatic cleaners are specifically formulated for odor elimination, targeting odors at the source rather than masking them. By following the dwell time and application guidelines, you give the enzymes time to neutralize odors effectively.
Oxygen-based bleaches (like sodium percarbonate) are a powerful ally for staining on color-safe fabrics. They brighten without the harshness of chlorine bleach. You’ll often find them as a main ingredient in many “oxy” stain removers. They are great for tackling the ugly yellow or brown marks urine leaves behind.
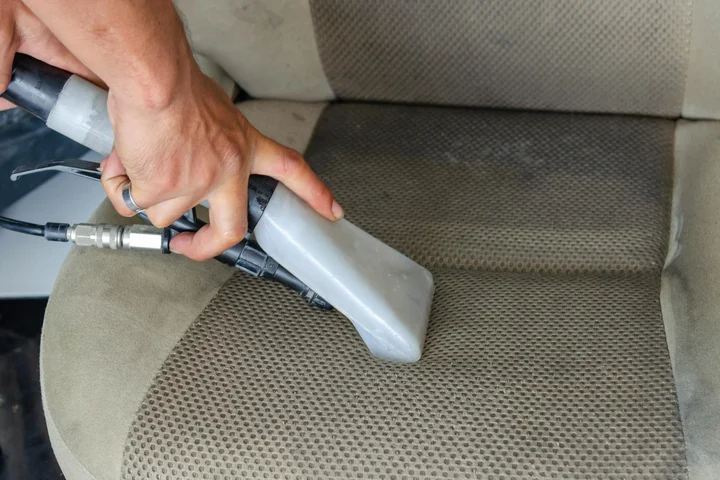
For a deep-set stain in a large sofa, consider renting a professional-grade upholstery extractor. It works like a wet/dry vacuum but injects cleaning solution and pulls it back out powerfully. This is what I did for our family room chair after a particularly stubborn incident. It gets moisture and cleaner deep into the cushion where spraying and blotting can’t reach. This can significantly aid in removing tough stains from fabric sofas.
Cleaning Supplies to Avoid
This list is short but critical. Using the wrong cleaner can make your problem permanent.
- Ammonia-Based Cleaners: Never. Cat urine contains ammonia. Using a cleaner with ammonia signals to your cat that this is an approved bathroom spot. It reinforces the bad behavior.
- Steam Cleaners with Chemical Detergents: The intense heat can actually cook the urine proteins into the fabric, setting the odor permanently. If you use one, use only water.
- Vinegar or Baking Soda Alone: While great as a team or for fresh smells, they don’t break down the uric acid crystals. For an old stain, this is like putting a bandage on a splinter. The problem remains underneath.
- Excessive Moisture: Soaking the cushion is a recipe for mold and mildew. Your goal is “damp,” not “soaked.” Always extract or blot as much moisture as you humanly can. A fan pointed at the area helps it dry faster.
Remember, your goal is to remove the stain completely and erase the scent map for your cat. Starting with the right tools puts you halfway there.
How to Clean a Fresh Cat Urine Stain from Fabric
You just found it. The stain is still damp and the smell is sharp. Take a breath, because this is the best time to act. A fresh stain hasn’t had time to crystallize deep in the padding, which means you can often stop the odor for good right now. Grab some old towels and let’s get started.
Step-by-Step Guide for Upholstery and Couches
Follow these steps in order. The goal is to remove the source, neutralize the acid, and then destroy the odor-causing bacteria.
- Blot up all liquid. Press straight down with a thick stack of paper towels or a clean, dry towel. Keep folding to a clean section as you work. Your aim is to soak up every bit of moisture you can see and feel. Do not rub.
- Neutralize with a vinegar solution. Mix equal parts white distilled vinegar and cool water in a spray bottle. Lightly mist the stained area until it is damp, not soaking. The vinegar works to break down the uric acid salts. Let it sit for 5-10 minutes, then blot it all up again with a dry towel.
- Apply an enzymatic cleaner. This is the most important step. Soak the area with a commercial enzymatic cleaner, like Nature’s Miracle or Rocco & Roxie, following the label’s directions. You must completely saturate the spot so the solution penetrates every layer the urine reached.
- Let it dwell. Do not blot or rush this. The enzymes need time, often several hours, to “eat” the organic waste. Cover the area with plastic wrap to keep it wet if you need to.
- Blot it as dry as possible. After the dwell time, use dry towels to blot up all the leftover moisture. Then, let the area air dry completely. You can use a fan to speed this up.
For crevices or under cushions, I use a small syringe or a spoon to gently pull cushions apart and get cleaner into the hidden spots. Always check your furniture’s care tag first and test any cleaner on a hidden seam.
Blotting Technique: Why It Matters
Think of your towel as a sponge soaking up a spilled soda. You press the sponge straight down into the liquid, lift, and repeat. You would never smear the sponge back and forth across the table, because that would just push the sticky mess into the wood grain.
Fabric and cushion foam are like that wood grain. Rubbing or scrubbing grinds the urine crystals deeper, making the stain and odor permanent. Each press with a clean part of your towel pulls the moisture up and out, which is the only way to truly remove it.
Field Note: A Pro-Tip from Experience
Our golden retriever, Peeta, had a bad tummy issue on my favorite armchair once. I did everything right on the surface, but a faint sour smell lingered weeks later. The problem was in the cushion core, where my surface cleaning couldn’t reach.
My solution was a turkey baster from the kitchen drawer. I filled it with enzymatic cleaner, gently parted the fabric seams, and injected a small amount deep into the cushion’s heart. It felt a bit strange, but it worked. The hidden reservoir of odor was finally gone.
For textured fabrics like velour or microsuede, I keep an old, soft-bristled toothbrush handy. After applying the enzymatic cleaner, I use the brush to gently agitate the solution. I work from the outside of the stain inward in little circles. This helps the cleaner foam up and penetrate the tiny fibers without damaging the fabric’s texture.
How to Treat Old, Set-In Stains and Lingering Odor

You found the stain after the smell started creeping back on a warm day. Maybe you tried a quick spot clean, but the yellow mark and that sharp, unmistakable odor are still there, a permanent guest on your favorite chair. Treating old stains is a different game than tackling a fresh accident. You need to be more patient and a lot more thorough.
You can achieve a massive improvement and make the furniture livable again, but you should know that a stain that’s soaked in for months might leave a faint shadow or memory of a smell you can only detect if you press your face into the fabric. The goal is to break down what you can and neutralize the rest so your living room doesn’t smell like a litter box.
Assessing the Damage: Is It Too Late?
First, figure out what you’re really dealing with. Old urine doesn’t just sit on the surface. It wicks down into the cushion foam or batting below, where it crystallizes. Every time humidity rises, those crystals reactivate and release odor. This is why a couch can smell fine one day and awful the next.
Do a simple check. Press down on the stained cushion. Does it feel damp, or is there a stiff, crusty area? That’s a bad sign. After the fabric is completely dry, get close. I mean, really get your nose down on it and take a slow sniff in different spots. The strongest odor will lead you to the epicenter, the ground zero where the urine soaked deepest into the padding. That’s the spot you need to attack with everything you’ve got.
Using Enzymatic Cleaners: The Best Way to Break Down Urine
For old pet stains, an enzymatic cleaner isn’t just a good idea, it’s the only thing that tackles the source of the odor. Forget vinegar and baking soda for this job. Those might mask the smell temporarily, but they leave the urine salts intact. Enzymatic cleaners contain live bacteria that act like microscopic cleanup crews.
These bacteria literally eat the organic waste in urine, breaking down the crystals that cause the stubborn smell. I keep a bottle of Nature’s Miracle Urine Destroyer on hand for my dog Peeta’s rare indoor accidents and the mystery stains my kids’ friends leave behind.
Using it correctly is key. You must saturate the area. I’m not talking about a light spray. Soak it until the fabric and the padding underneath are wet. Then, cover the wet spot tightly with plastic wrap. This keeps the solution from drying out too fast. The enzymes need to stay moist and active for a long time to work.
Leave it covered for at least 12 hours, or even a full 24 for a severe, old stain. This is the most reliable answer for “how do I get that dog smell out of my couch” when it’s been there for weeks. After the time is up, remove the plastic and let the area air dry completely. Patience here is everything.
Deep Cleaning for Padding and Cushions
If the cushion has a removable cover, you’re in luck. Take the cover off and wash it separately according to the tag. While it’s off, spray the inner foam core liberally with your enzymatic cleaner, let it sit, and let it air dry.
Most furniture isn’t that cooperative. For cushions you can’t take apart, you have to get the cleaner down *into* the padding. This is where the injection method comes in. You’ll need a syringe (like a large medical syringe without a needle, available at farm supply stores or online) and your enzymatic cleaner.
Pull back the fabric slightly at the seam, if you can. Insert the syringe tip into the cushion foam and slowly inject the cleaner in several spots around the stained area. You’re delivering the treatment directly to the crime scene inside the cushion. After injecting, press down on the cushion to help the solution spread, then cover the wet fabric with plastic wrap as before. Once the enzymatic treatment is done, use a wet/dry vacuum to extract as much moisture as possible from the fabric surface. This cuts down drying time dramatically.
Post-Treatment Recovery: Drying and Checking for Success
Drying is a critical step you can’t rush. You must use air drying only. Place the furniture in a well-ventilated room. Use fans to circulate air, but do not point a space heater at it or place it in direct sunlight.
Heat and sun can bake any remaining stain or cleaning residue into the fabric, setting it permanently and causing colors to fade. I learned this the hard way with a patio cushion that ended up with a clean but glaringly white spot after sun-drying.
How do you know if it worked? After the fabric and cushion feel completely dry to the touch, wait another day. Then, do the nose test again. Get right up on the spot and take a deep breath. If you catch even a faint whisper of urine, the bacteria are still active or you missed a spot. Repeat the enzymatic treatment on that specific area.
Only when the spot passes the sniff test with flying colors should you consider using the furniture normally. Never use a hair dryer, clothes dryer, or heater on the piece until you are absolutely certain the stain and odor are gone, as heat will lock in any failure. It’s a slow process, but it’s the only way to truly reclaim your couch from an old, set-in stain.
Special Surfaces and Troubleshooting

Our standard cleaning steps are a fantastic foundation, but furniture comes dressed in all sorts of materials. The most critical step for any special fabric is to check the manufacturer’s cleaning code, usually found on a tag under a cushion. If that tag is long gone, don’t worry. A cautious, test-first approach will guide you.
Surface Compatibility Chart: Adapting Methods
Think of this as your quick-reference guide. When in doubt, always test your cleaning solution on a hidden spot first, like the back or underside of a cushion.
- Microfiber: Enzyme cleaners work well here. Blot carefully and avoid vigorous scrubbing, as you can mat the fibers and create a noticeable shiny spot. I use a white cloth and press straight down.
- Velvet: This pile is delicate. Test a diluted vinegar solution on a hidden seam. If you proceed, blot only in the direction of the pile-never scrub in circles. My mom Martha’s old velvet chair taught me this the hard way.
- Cotton or Polyester Blends: These are your most forgiving, workhorse fabrics. You can usually follow the standard steps with confidence.
- Leather: Use only products made for leather. Do not use vinegar, baking soda, or enzyme cleaners unless the leather care product itself contains them. They can strip oils and cause cracking.
- Suede: I recommend professional cleaning immediately for any liquid accident. For a fresh, surface-level incident, a dry absorbent is your only safe DIY bet.
How to Clean Cat Urine from Leather or Suede Furniture
These surfaces require a gentle touch and specialized products. The goal is to clean without damaging the material’s finish or nap.
For Leather Furniture:
- Blot immediately with a dry, absorbent cloth. Press firmly to soak up all the liquid you can.
- Dampen a clean, soft cloth (cotton is best) with cool water. Wring it out so it’s only slightly damp.
- Add a drop of mild, pH-balanced leather or saddle soap to the cloth. Gently wipe the affected area, following the natural grain of the leather.
- Rinse the cloth thoroughly, wring it out well again, and wipe the area to remove any soapy residue. Let it air dry completely, away from direct heat.
- Once fully dry, apply a quality leather conditioner to restore moisture and protect the surface. Never use ammonia or vinegar on leather, as they will dry it out and cause permanent damage.
For Suede Furniture:
- Blot gently with a dry cloth to lift any surface moisture. Do not rub.
- Immediately sprinkle a generous amount of plain cornstarch or baking soda over the spot. Gently pat it in. This will help pull moisture from the fibers.
- Let it sit for several hours, or preferably overnight.
- Use a soft suede brush to gently brush the powder away. Vacuum any residue with a brush attachment.
For anything beyond this simple dry absorption, please call a professional. Water and homemade solutions can leave permanent water rings and stiffen the delicate nap. My Aunt Jessica learned this with a wine splash on a suede ottoman, and only a pro could fix it.
When NOT to Try This: Limitations and Risks
Being a good home cleaner also means knowing when to call for backup. Here are the signs that your DIY journey should end.
- The stained area is very large (more than a dinner plate). This often means the urine has saturated deep into the inner cushions or frame, which is beyond surface cleaning.
- The piece is a valuable antique or an important heirloom. The risk of accidental damage is too high.
- You’ve followed the process correctly two or three times, but the sour, ammonia-like odor still returns once the area dries. This signals a deep-seated problem in the cushion core or wood frame.
- The fabric is extremely delicate: think silk, uncertified velvet, or a fragile vintage material.
If you see any discoloration, fading, or fabric distortion during your cleaning, stop immediately. Blot the area with cool water to rinse and let it dry. Continuing will likely make the damage worse. For these tricky jobs, a professional upholstery cleaner with experience in pet odor removal is your best investment.
Keeping It Clean: Prevention and Professional Help
Once you’ve tackled the immediate stain and odor, your next thought is probably, “How do I stop this from happening again?” And honestly, you might be wondering if your couch will ever feel truly clean again. Let’s look ahead with a practical plan to remove stubborn odors from furniture upholstery.
How to Protect Furniture from Future Cat Accidents
The best defense is a good, washable offense. My aunt Jessica in Arizona has two cats and a beautiful cream-colored sofa. Her secret? A stack of attractive, machine-washable throws she rotates weekly.
Drape a thick, absorbent blanket or a fitted furniture cover over your cat’s favorite napping spot; it’s your first line of defense and the easiest thing to wash.
If an accident happens on the cover, you’re just cleaning the cover, not digging into the upholstery padding. I use the same strategy for our dog, Peeta. A dedicated blanket on his corner of the couch saves me from constantly cleaning doggy drool and dirt.
But covers are just a bandage. You need to address the “why.”
- Rule Out Health Issues: A sudden change in bathroom habits is often the first sign of a urinary tract infection, kidney issues, or diabetes. A vet visit isn’t just for your furniture’s sake; it’s for your cat’s well-being.
- Litter Box 101: Cats are clean creatures. Ensure you have one more litter box than you have cats, placed in quiet, low-traffic areas. Scoop at least once a day. My mom, Martha, always said a clean box is the best cat repellent for your sofa.
- Reduce Stress: New pets, moving furniture, or loud noises can cause anxiety marking. Synthetic pheromone sprays or diffusers (like Feliway) can help create a calming environment. Sometimes, just providing a high perch or a hiding spot can make a world of difference.
When to Consider Professional Cleaning
There’s no shame in calling for backup. I’ve done it. When my son Jason and his friend Edward had a series of “juice box incidents” that seeped deep into a chair, my home methods hit their limit.
If you’re facing multiple old, set-in stains, a persistent odor that seems to come from within the furniture itself, or a piece that’s too expensive or sentimental to risk, it’s time to call a professional.
Here’s what they bring to the table that we can’t easily replicate at home:
- Industrial-Strength Equipment: They use truck-mounted or powerful portable extractors that pull much more water and dissolved waste out of the deep padding than any home carpet cleaner can. This suction power is key to removing the last traces of urine.
- Advanced Treatment Cocktails: Professionals have access to stronger enzymatic digesters and odor neutralizers designed for commercial use. They know how to safely apply them to different fabrics without causing damage or discoloration.
- Deep Penetration: Their process forces cleaning solution and rinse water all the way through the upholstery fabric and into the cushion core, then extracts it. This is the only way to truly reach urine that has migrated deep down.
Think of it this way: you can clean a surface scrape yourself, but a deep wound needs a doctor. For that one chair that smells every time the room gets humid, or the heirloom sofa you can’t replace, professional cleaning is the surest path to peace. It’s an investment in restoring your home’s comfort and your own peace of mind.
FAQ about Removing Cat Urine from Furniture
What enzymatic cleaners are recommended and how should I use them?
Look for dedicated pet urine formulas like Nature’s Miracle or Rocco & Roxie. To use them correctly, completely saturate the stain, cover it with plastic wrap to keep it wet, and allow it to dwell for at least 12-24 hours so the enzymes can work.
How do I remove cat urine odor deep in the furniture padding or cushions?
For deep-seated odor, you must get cleaner into the cushion core. Use a syringe to inject enzymatic cleaner directly into the foam through the fabric seam, then cover and let it dwell before thoroughly drying the area.
Can I just use baking soda and vinegar, and what’s the correct method?
This duo is only a temporary fix for fresh stains, not a cure for old ones. Blot the area, sprinkle baking soda, spritz with a 50/50 vinegar-water mix, let it fizz, then blot everything up until the fabric is barely damp. Set-in stains require a different approach.
How do I clean cat urine from delicate leather or suede furniture?
For leather, blot immediately and clean only with a damp cloth and a drop of pH-balanced leather soap. For suede, blot dry and use cornstarch to absorb moisture; for anything beyond a surface spot, call a professional cleaner immediately to avoid damage. When handling delicate materials, such as leather and suede, it’s important to use the right stain removal techniques.
When should I stop trying DIY methods and call a professional?
Call a pro if the odor persists after multiple treatments, the stain is very large and old, or the furniture is a valuable antique. For DIY guidance, our odor removal secondhand furniture guide offers practical steps. Professionals have industrial extractors and commercial-grade treatments that can reach deep contamination home methods can’t.
Long-Term Care for Your Treated Furniture
Your best defense against recurring cat urine odor is a thorough application of enzymatic cleaner, which dissolves the smell at its source. Always blot stains gently and confirm colorfastness in a hidden corner first to keep fabrics intact. These methods also apply to removing urine odor from fabrics when accidents happen. I write about all my real-world tests, from Jessica’s juice spills to Peeta’s muddy footprints, right here on the blog.
Suzanne is an accomplished chemist, laundry expert and proud mom. She knows the science and chemistry of stains and has personally deal with all kinds of stains such as oil, grease, food and others. She brings her chemistry knowledge and degree expertise to explain and decode the science of stain removal, along with her decades long experience of stain removal. She has tried almost everything and is an expert on professional and DIY stain removal from clothes, fabric, carpet, leather and any other items dearest to you.